自定制标签栏 UITabBar
引言
当系统提供的 UITabBar(标签栏)的样式不能够满足开发的需求时,我们需要隐藏系统的标签栏,自己对其进行定制。
系统定制
创建一个 UITabBarController 的子类,将视图控制器添加到标签栏控制器中:1
2
3
4
5
6
7
8
9
10
11
12
13
14
15
16
17
18
19
20
21
22
23// 添加第一个试图控制器
HTHomeViewController * homeVc = [[HTHomeViewController alloc] init];
homeVc.tabBarItem.image = OriginalIMGStr(@"Home-point");
homeVc.tabBarItem.selectedImage = OriginalIMGStr(@"Home");
UINavigationController * homeNVC = [[UINavigationController alloc] initWithRootViewController:homeVc];
[self addChildViewController:homeNVC];
// 添加第二个视图控制器
HTAddViewController * addVc = [[HTAddViewController alloc] init];
addVc.tabBarItem.enabled = NO;
[self addChildViewController:addVc];
// 添加第三个视图控制器
HTMineViewController * mineVc = [[HTMineViewController alloc] init];
mineVc.tabBarItem.image = OriginalIMGStr(@"my-point");
mineVc.tabBarItem.selectedImage = OriginalIMGStr(@"my");
UINavigationController * mineNVC = [[UINavigationController alloc] initWithRootViewController:mineVc];
[self addChildViewController:mineNVC];
//调整 UITabBar 上的图片位置
UIEdgeInsets leftInsets = UIEdgeInsetsMake(7, 15, -7, -15);
UIEdgeInsets addInsets = UIEdgeInsetsMake(6, 0, -6, 0);
UIEdgeInsets rightInsets = UIEdgeInsetsMake(7, -15, -7, 15);
homeVc.tabBarItem.imageInsets = leftInsets;
addVc.tabBarItem.imageInsets = addInsets;
mineVc.tabBarItem.imageInsets = rightInsets;
将 UITabBar 置为黑色 self.tabBar.barStyle = UIBarStyleBlack;,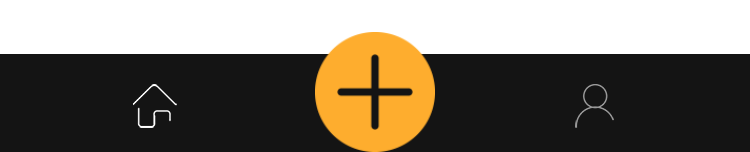
进行定制上图样式的 UITabBar1
2
3
4
5
6
7
8
9
10
11
12
13
14
15
16
17- (void)customAddImg{
addBtn = [UIButton buttonWithType:UIButtonTypeCustom];
[addBtn setImage:OriginalIMGStr(@"add_icon") forState:UIControlStateNormal];
[addBtn setImage:[UIImage imageNamed:@"add_icon"] forState:UIControlStateSelected];
addBtn.adjustsImageWhenHighlighted = NO;
addBtn.frame = CGRectMake(0, 0, 60, 60);
// 核心代码在这里
CGFloat HDiff = addBtn.bounds.size.height - self.tabBar.frame.size.height;
addBtn.center = CGPointMake(self.tabBar.frame.size.width * 0.5, self.tabBar.center.y - HDiff / 2);
[addBtn addTarget:self action:@selector(jumpAddVC) forControlEvents:UIControlEventTouchUpInside];
[self.view addSubview:addBtn];
}
// 中间的点击事件
- (void)jumpAddVC{
HTAddViewController * addVC = [[HTAddViewController alloc] init];
[self presentViewController:addVC animated:YES completion:nil];
}
自定制
隐藏系统提供的 UITabBar 的样式 self.tabBar.hidden = YES;,往标签栏容器上添加视图控制器1
2
3
4
5
6
7
8
9
10UIViewController *vc1 = [[FirstViewController alloc] init];
vc1.title = @"界面1";
UIViewController *vc2 = [[SecondViewController alloc] init];
vc2.title = @"界面2";
UIViewController *vc3 =[[ThirdViewController alloc] init];
vc3.title = @"界面3";
UIViewController *vc4 =[[FourthViewController alloc] init];
vc4.title = @"界面4";
NSArray *controllers = [NSArray arrayWithObjects:vc1,vc2,vc3,vc4,nil];
self.viewControllers = controllers;
定制底部 UITabBar 控制器(平常使用 UIButton 进行定制最多)
1
2
3
4
5
6
7
8
9
10
11
12
13
14
15
16
17
18
19
20
21
22
23
24
25
26
27
28
29
30
31
32
33
34
35
36
37
38
39//UIImageView+UIButton+UILabel(底部紫色的指示条)
- (void)createCustomTabBar{
// 背景图
UIImageView *bgView = [[UIImageView alloc] initWithFrame:CGRectMake(0, HEIGHT-49, WIDTH, 49)];
bgView.tag = 999;
bgView.backgroundColor = [UIColor whiteColor];
// bgView.image = [UIImage imageNamed:@"tabbg.png"];
//开启用户交互属性
bgView.userInteractionEnabled = YES;
[self.view addSubview:bgView];
//间隔
CGFloat space = (WIDTH-4*30)/5;
for (int i = 0; i<4; i++) {
NSString *imageName = [NSString stringWithFormat:@"tab_%d.png",i];
NSString *selectImageName =[NSString stringWithFormat:@"tab_c%d.png",i];
UIButton *btn = [UIButton buttonWithType:UIButtonTypeCustom];
// 设置背景颜色
[btn setBackgroundImage:[UIImage imageNamed:imageName] forState:UIControlStateNormal];
//设置btn处于选中状态下的图片
[btn setBackgroundImage:[UIImage imageNamed:selectImageName] forState:UIControlStateSelected];
//UIControlStateSelected 此状态由UIButton 的selected属性来控制
btn.tag = i+100;
if (btn.tag == 100) {
//selected 属性为YES,button处于选中状态
btn.selected = YES;
}
btn.frame = CGRectMake(space+i*(space +30),(49-30)/2,30,30);
[btn addTarget:self action:@selector(btnClicked:) forControlEvents:UIControlEventTouchUpInside];
//将button加到imageView上
[bgView addSubview:btn];
}
//用于指示的uilabel
UILabel *tipLabel = [[UILabel alloc] initWithFrame:CGRectMake(space,41,30,2)];
tipLabel.backgroundColor = [UIColor purpleColor];
tipLabel.tag = 998;
[bgView addSubview:tipLabel];
}
实现点击效果1
2
3
4
5
6
7
8
9
10
11
12
13
14
15
16
17
18
19
20
21
22
23
24
25
26
27
28
29
30
31
32
33
34
35
36
37
38- (void)btnClicked:(UIButton *)btn{
//切换视图控制器
NSInteger index = btn.tag-100;
//改变selectedIndex属性,标签栏控制器会自动实现视图控制器view的切换
self.selectedIndex = index;
// 获取背景图
UIImageView *bgView = (UIImageView*)[self.view viewWithTag:999];
//改btn的状态
//通过imageView的子视图数组拿到btn
for (UIView *view in bgView.subviews) {
if ([view isKindOfClass:[UIButton class]]) {
//拿到btn
UIButton *currentBtn = (UIButton *)view;
if (currentBtn.tag == btn.tag) {
//为选中状态
currentBtn.selected = YES;
}else{
//常态
currentBtn.selected = NO;
}
}
}
CGFloat space = (WIDTH-4*30)/5;
//改变tipLabel的横坐标
UILabel *tipLabel = (UILabel *)[bgView viewWithTag:998];
//给label x坐标的改变过程加一个过渡(缓冲)动画
//animateWithDuration:后续代码执行时长
//^{ }是一个不是马上被执行的代码片段:匿名函数(block)
[UIView animateWithDuration:0.3 animations:^{
//写在里面的代码会在0.3秒的时间完成
CGRect frame = tipLabel.frame;
//改变x
frame.origin.x = space + index*(space +30);
//将更改后的frame重新赋值给label
tipLabel.frame = frame;
}];
}
参考资料
0、IOS 定制中间突出UItabBar
1、Apple UITabBar
2、做一款仿映客的直播App?看我就够了
3、RaisedCenterTabBar
