App 证书和上线相关知识
配置证书
0、首先我们应该有 App 开发者账号
我们可以去Apple开发者官网上申请账号,我们需要提供注册邮箱,一定要记住自己的密保问题,同时我们需要用信用卡支付一定的费用,请记住强大的淘宝可以解决任何问题。(注:yourAccount.age > 18)
Certificates
1、在开发者中心,点击开发者证书选项,进入相应的配置证书网页。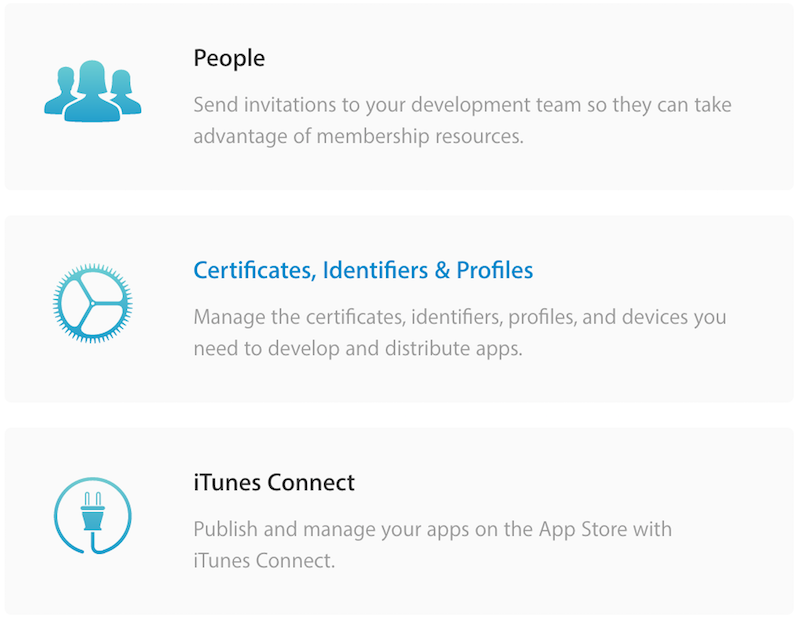
2、选择相应的开发选项(iOS Apps)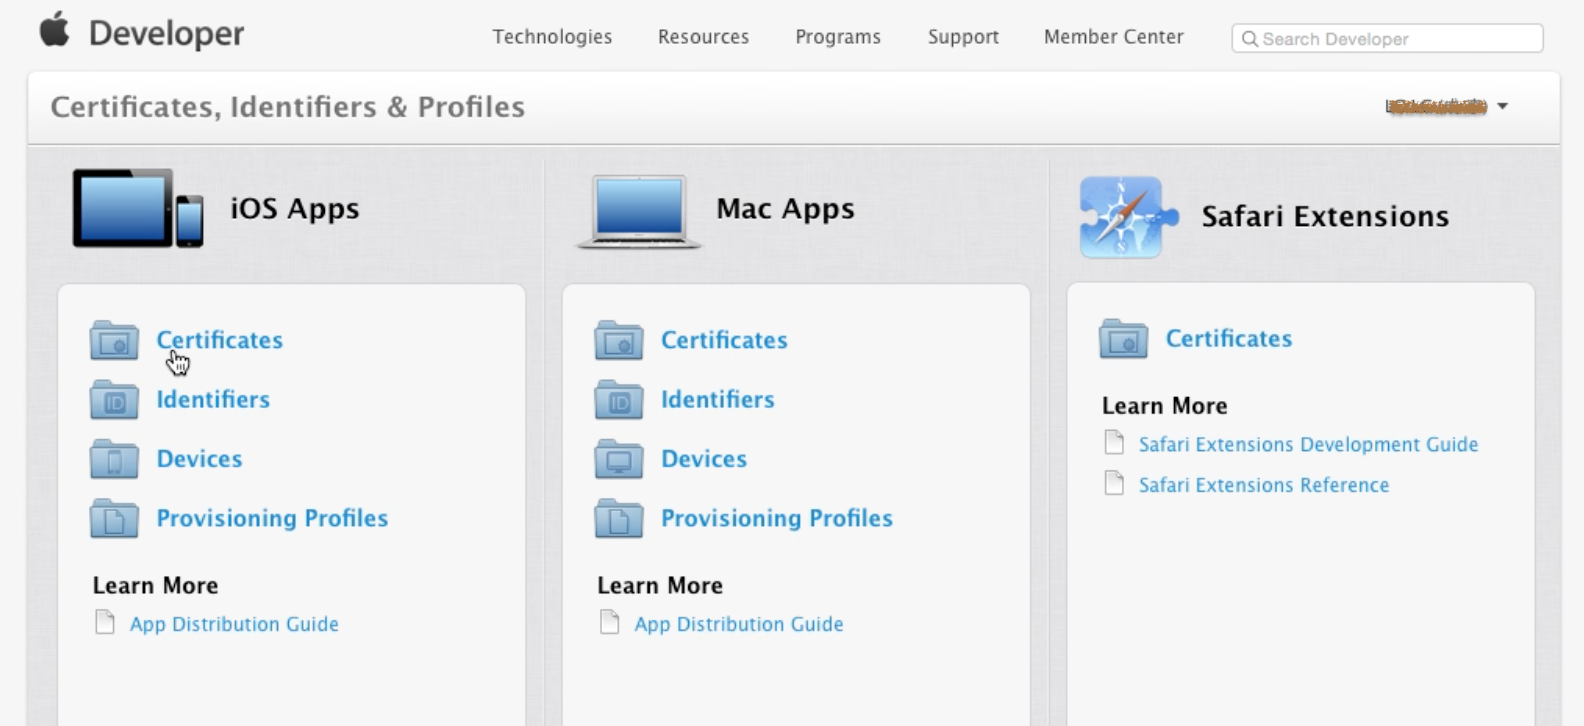
3、配置开发和发布证书。(Certificates)
创建电脑CSR证书文件(电脑签名):钥匙串访问 -> 证书助理 -> 从证书颁发机构请求证书… -> 电子邮件(存储到磁盘)
在开发者网站上传证书文件 -> 将证书下载到本地(ios_development.cer或ios_production.cer文件)-> 双击进行安装
真机测试所用证书为Development,上线所用证书为Production。
选择相应的证书,证书又分为开发证书和上线证书,开发证书中又分为开发和推送证书。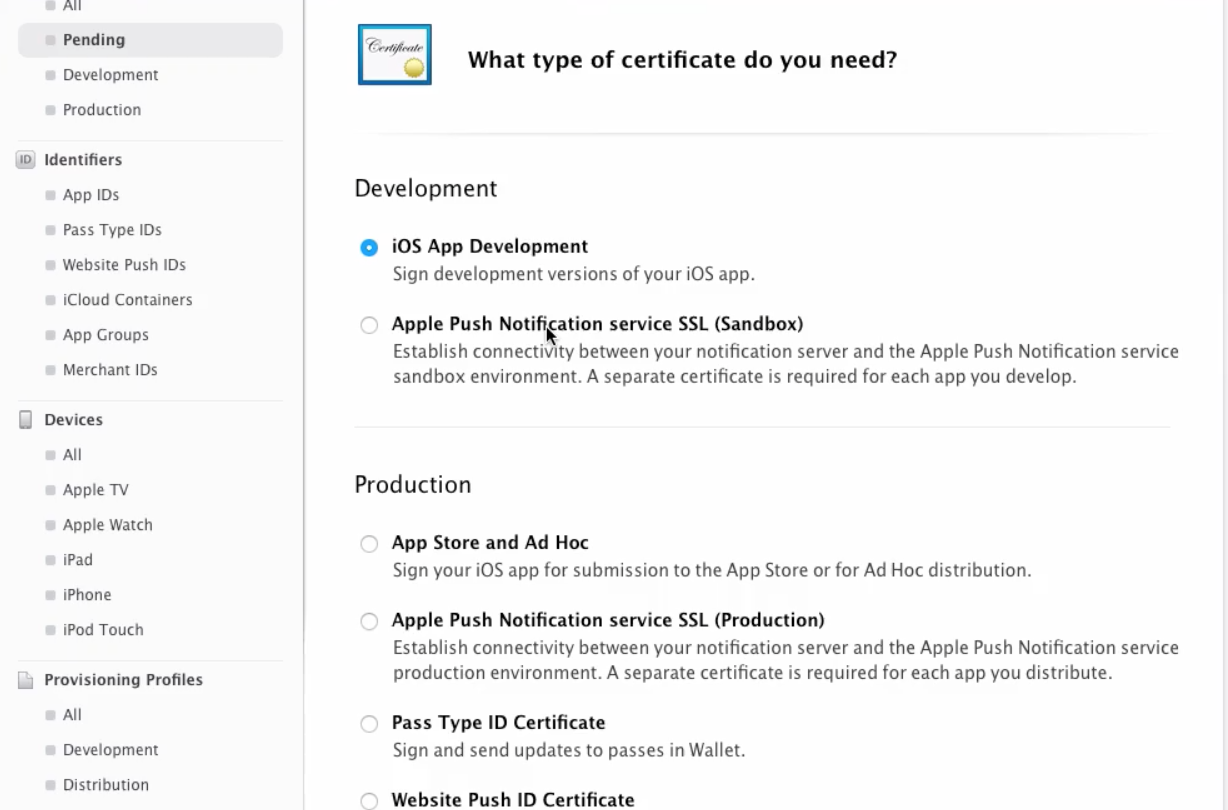
完成PC端电脑证书的创建(Development和Production证书)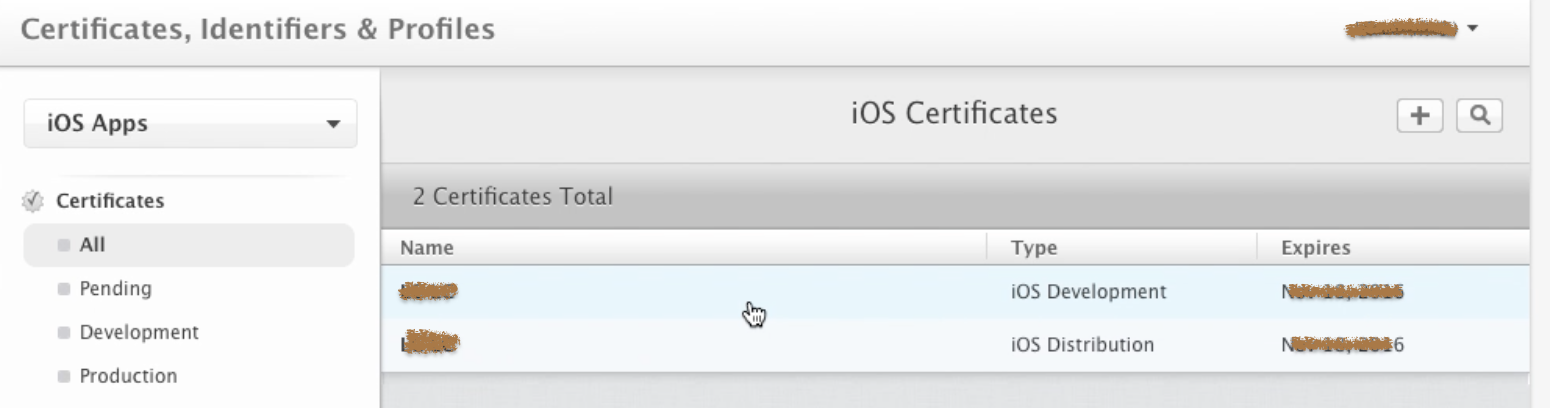
Upload CRS Certificate
遇到 Upload CRS Certificate,需要本地签名,点击钥匙串中证书颁发机构请求证书...,填写相关信息后,将证书存储到磁盘,然后上传 crs 文件,生成相应的证书。
注:一台电脑只能做1个证书,一个账号最多注册3个证书。只有证书的拥有者,才有权利下载,其他用户下载无效。
Identifiers
4、添加App应用的Bundle ID(Identifiers),可以有N个。
0、添加描述,最好是应用的名字。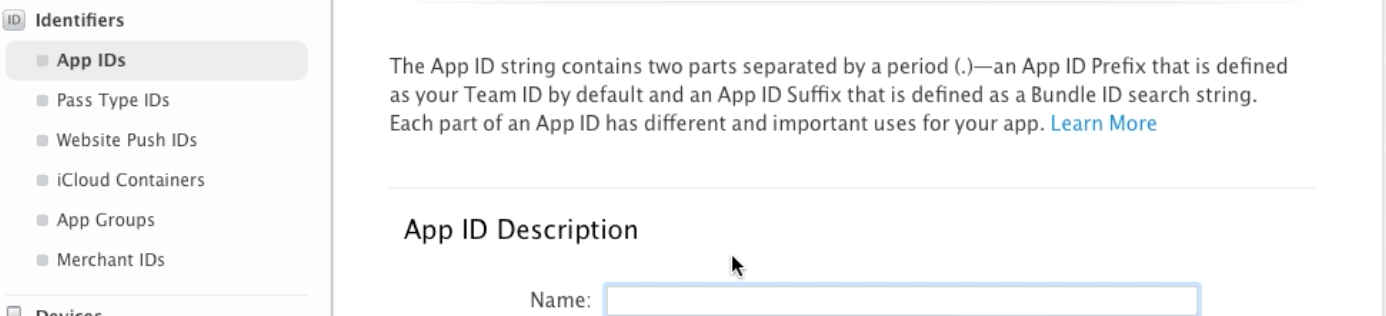
1、添加Bundle Identifier,可以从Xcode中获取
App ID Prefix 应用的前缀,一个开发者账号为一个team,系统默认为开发者账号分配。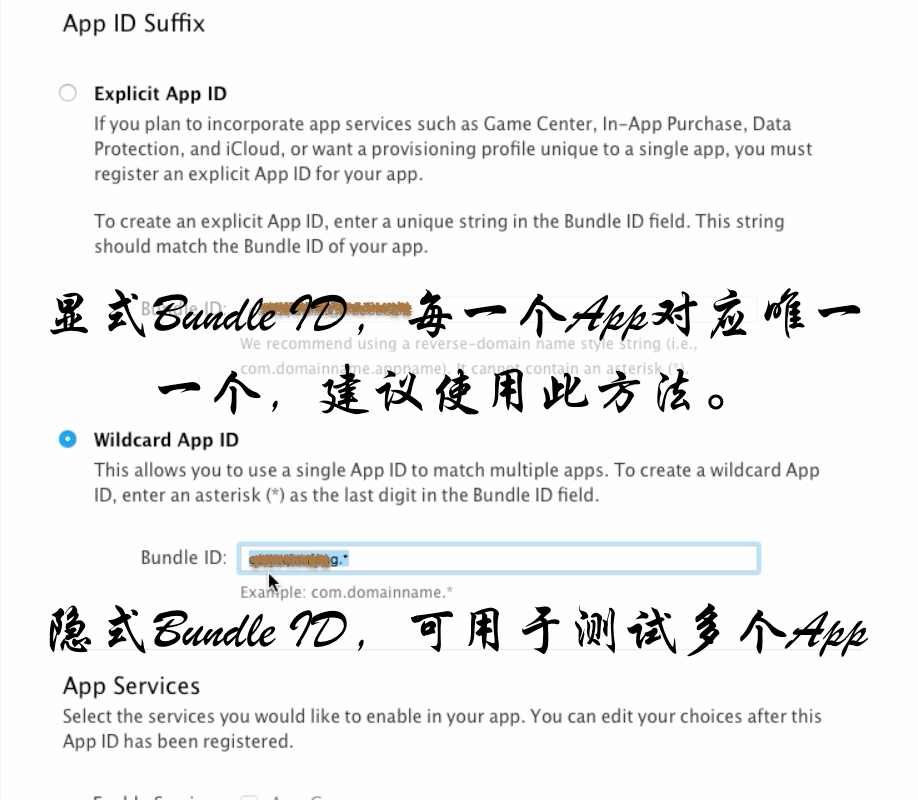
Devices
5、添加测试设备(用于真机测试—Devices),一个账号最多关联一种设备100台。
Xcode 7 以下需要获取设备Identifier进行测试
在iTunes 、Xcode(Window -> Devices)可以查看设备标识
注:Xcode 7 以后不需要添加设备信息,可以直接进行测试。
Profiles
6、将以上配置文件相关联(Provisioning Profiels,简称为配置文件)
先关联应用(Bundle ID)-> 其次关联证书 -> 然后需要关联设备 -> 最后生成关联文件 -> 下载配置文件 -> 双击安装。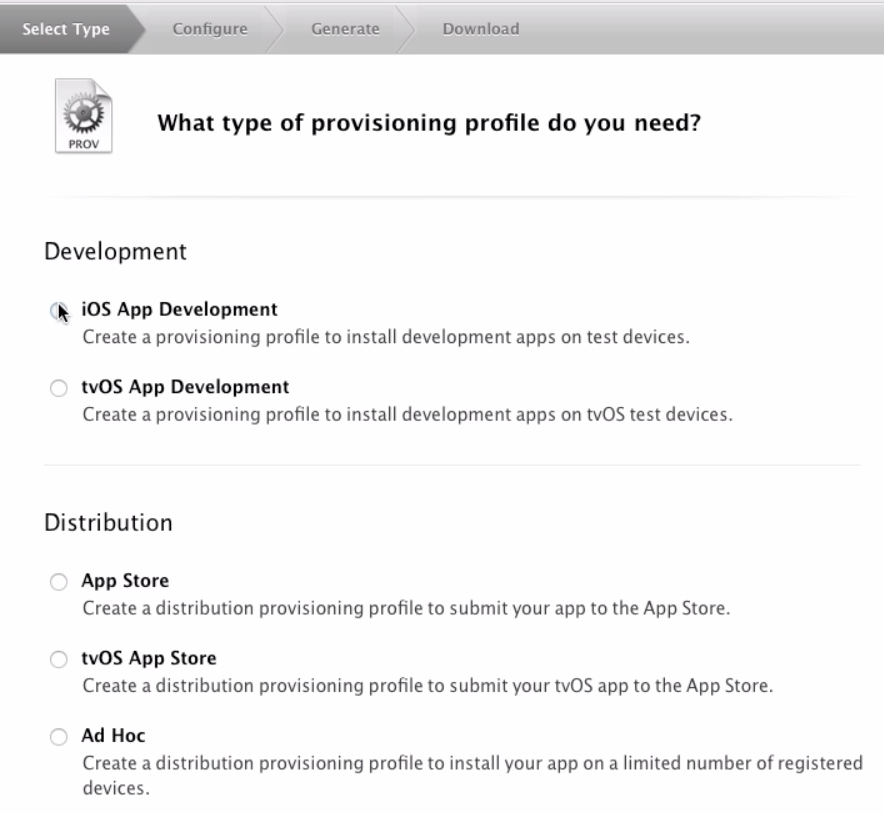
双击安装后的位置为~/Library/MobileDevice/Provisioning Profiles
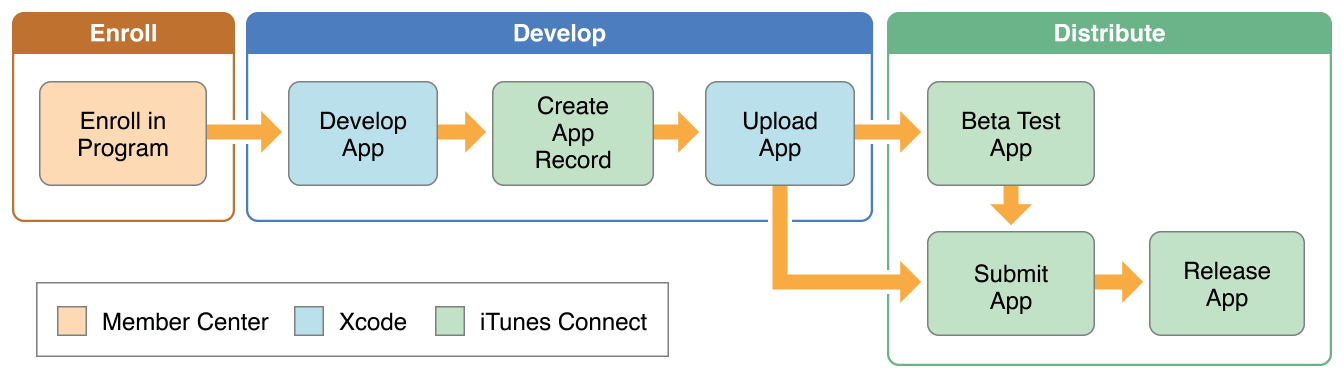
iTunes Connect
1、关于iTunes Connect
iTunes Connect是一套基于 Web 的工具,专为开发者创建,用以提交和管理在 App Store 或 Mac App Store 上销售的 App.
2、如何更改iTunes Connect显示语言
注意: 某些 iTunes Connect 页面可使用英语以外的其他语言进行查看。若要更改在 iTunes Connect 中显示的语言,则必须在操作系统设置中更改语言偏好设置:在 Mac 上,请转到“系统偏好设置”,然后转到“语言与地区”
iTunes Connect 首页底边栏中的“联系我们”,是我们联系苹果的入口。
3、App Store 法则
以下内容自来网络:
(1)程序崩溃或者存在重大BUG:产品提审前一定要经过反复的测试,如果存在APP频繁崩溃或闪退,通过概率基本为零,在苹果丛林法则中,用户体验至上。
(2)适配:iPhone用五款型号的手机,一定要注意适配到iPhone4,例如iPhone4中页面少了一截,下面的操作按钮看不到的。
(3)Logo和UI:切忌勿模仿苹果的logo,否则是自掘坟墓,模仿竞品问题不会很大,但如果被举报了就另当别论了,个人是不太推崇此类做法,尽量保证logo和UI的原创,才能获取App更高的权重和提升曝光流量转下载的比例。
(4)App描述或应用内购买描述:切记出现“苹果官方” 、“App Store” 、“Apple Pay”等与苹果挂钩的关键词,苹果的版权意识极强。
(5)定位功能:获取用户定位,需要增加提示并告知用户干什么用,并允许用户拒绝。
(6)UCG内容: 用户产生内容的需要有举报功能;年龄限制等级是否过低;音视频类需要提供版权说明。
(7)诱导用户评论: App中出现“给个好评”、 “好评奖励”等诱导性评论,基本是要NG的。
(8)登录:第三方登录功能中,若用户没有安装微博、微信、QQ等,提示未安装也是不被允许的。解决方法:监测用户是否安装相应APP没有就变灰or隐藏相应图标。
4、加急审核
一旦加急,当天晚上就会出结果,即使审核失败,再次提交也会自动加速的。
操作步骤:
(1)登入苹果开发者后台(https://developer.apple.com/);
(2)点击后台首页下面的Contact Us;
(3)依次选择App Review/App Store Review/Request Expedited Review,最后点击对话框下面Request an Expedited App Review,便可成功进入加急审核页面
设置图标
1、屏幕尺寸
iPad:
786 x 1024
| 大小(英寸) | 像素 | 代表机型 |
|---|---|---|
| 3.5 | (640 x 960) | iPhone 4s |
| 4 | (640 x 1136) | iPhone 5s |
| 4.7 | (750 x 1334) | iPhone 6 |
| 5.5 | (1242 x 2208) | iPhone 6Plus |
| 6.5 | (1242 x 2268) | iPhone X |
2、icon 图标要求
1024.png(不能有透明通道,也不能是圆角)
| 图标名字 | 像素 |
|---|---|
| [email protected] | (58 x 58) |
| [email protected] | (87 x 87) |
| [email protected] | (80 x 80) |
| [email protected] | (120 x 120) |
| [email protected] | (120 x 120) |
| [email protected] | (180 x 180) |
真机调试
Xcode 7 之前需要证书(个人和企业证书),个人证书最多支持100台调试设备
1、如果iPhone OS高于Xcode支持版本
iPhone os版本高于Xcode版本,真机无法调试,但是我们可以将 Build 包导出,拖到 iTunes 中,选中手机,点击”应用”进行安装 or 更新。前提是手机 UDID 已经被添加到 Devices 中,并且相关证书配置正确的情况下,才能正常地运行。
2、显示iPhone上安装的证书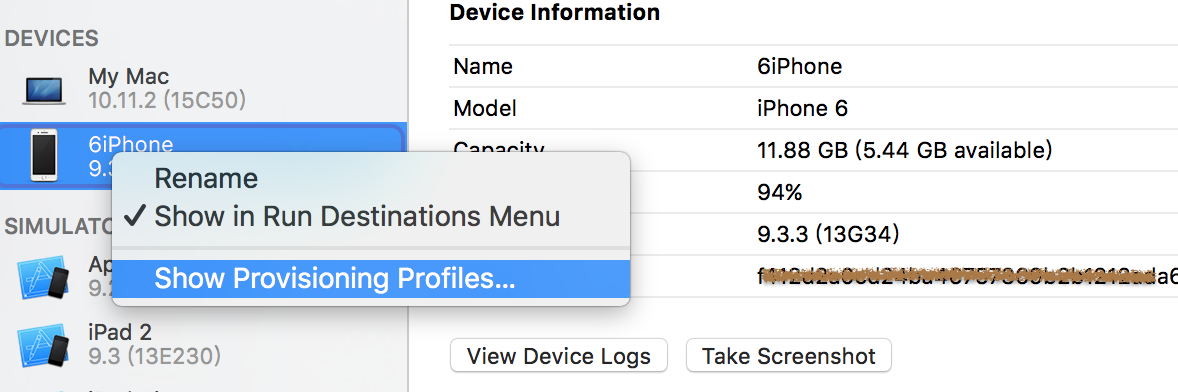
上传应用
登录iTunes Connect中心,新建App -> 选择支持平台 -> 应用名字 -> 选择套装ID -> SKU(随意)
填写App信息
1、设置App相关信息
应用名字
Bundle name
Bundle display name
归档时arachre 可能选对应的框架不一样
2、进行打包
没有真机,选 iOS Devices
多个人共用一个证书
多个人共用一个证书,使用p12文件
0、多个人共用一个证书,每个人只需配置App IDs、Devices、Profiles配置文件,就可以进行真机测试和上传应用。
1、在拥有csr证书签名的电脑中,找到钥匙串,点开相应的证书,右击导出文件另存为p12文件格式(可以设置p12文件的密码)。
小结:
1.电脑开发证书(可导出供多人使用, 也可以多次申请)
2.应用证书(每个应用不同, 需要多次申请)
3.真机测试证书(每台iPhone有自己的证书, 跟UIID绑定)
4.真机配置文件(可申请一次。)
此证书的签发者无效
我们在查看证书的时候可能会看到类似于“此证书的签发者无效”等类似的信息,我们要更新Apple Worldwide Developer Relations Certification Authority证书,先将此证书移除,然后下载添加。
Thanks for bringing this to the attention of the community and apologies for the issues you’ve been having. This issue stems from having a copy of the expired WWDR Intermediate certificate in both your System and Login keychains. To resolve the issue, you should first download and install the new WWDR intermediate certificate (by double-clicking on the file). Next, in the Keychain Access application, select the System keychain. Make sure to select “Show Expired Certificates” in the View menu and then delete the expired version of the Apple Worldwide Developer Relations Certificate Authority Intermediate certificate (expired on February 14, 2016). Your certificates should now appear as valid in Keychain Access and be available to Xcode for submissions to the App Store.
参考资料
0、Uploading archive error: “Missing iOS Distribution signing identity for …”
1、Apple Worldwide Developer Relations Intermediate Certificate Expiration
FAQ
valid provisioning profile
A valid provisioning profile for this executable was not found. app installation failed
1 | I think what you meant (clearly out of frustration) was that you've had no success with everything you've tried so far - no surprise when older versions are used as examples for current tools, I guess. |
参考资料
XCode :7 App installation failed :A valid provisioning profile for this executable was not found
A valid provisioning profile for this executable was not found. app installation failed
